Aligning Annotations
 There are many times that you will need to fill out a form in PDF format.
For example, if you are a freelance contractor in the United States, you'll often fill out a W-9 form.
A client may ask for this form, which is a request for your taxpayer identification information.
There are many times that you will need to fill out a form in PDF format.
For example, if you are a freelance contractor in the United States, you'll often fill out a W-9 form.
A client may ask for this form, which is a request for your taxpayer identification information.
You can fill out these PDF documents using the Text tool.
For most of these forms, you will use a text tool with a transparent background and without a border.
While you can add these text boxes manually and try to align them, it is difficult to get them arranged neatly, and
the outcome will look unprofessional.
Using the alignment tools make it easy to get your entries aligned perfectly.
Enter your information
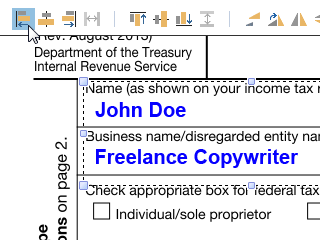
First, enter your information by creating multiple text boxes using the text tool. Don't worry about getting the text boxes aligned. Just click on the document and add your text. When you are finished, choose the Select tool.

Then, move one text box to the location where you want the text boxes to align.
For example, when filling out a form you may want all of the entries to align to the left of the page.
Select text boxes and align them
The alignment tools will only be active when two or more annotations have been selected. They will be greyed out otherwise and will be unavailable.
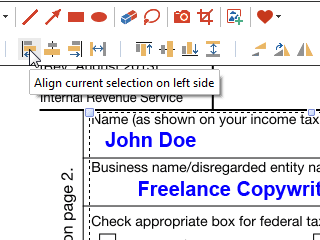
Using the Select tool, select all of the text boxes that you want aligned. You can select them all by placing the selection arrow at one corner and then pull it down diagonally across the text boxes until all of them are selected. Or you can do this by using the Lasso tool to "draw" a circle around all of the text boxes. The boxes are now temporarily grouped to a selection.
The previously greyed out alignment buttons will now be activated on the tool bar.
Click on the left side alignment tool and the text for all of the text boxes will be aligned to the left.
Additional selection and alignment tips
If you do not want all of the text boxes to align together, you can choose only the boxes you do. To do this, hold down on the CTRL key and then click on each box you want to align. One click will include an annotation into the selection, clicking it again will exclude it.
This allows you to work with forms that have multiple text entries on a single line that you do not want to be
aligned
to the left.
This could cause them to layer on top of each other.
If that happens, just use the Undo arrow to move the items back to their original position.
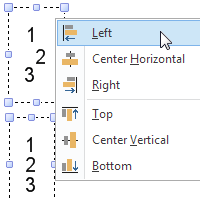
Here is a list of all of the alignment possibilities available:
|
|
Align current selection on the left side (it will choose the leftmost annotation) |
|
|
Center horizontally |
|
|
Align on the right side (it will choose the rightmost annotation) |
|
|
Space selected annotations equally horizontally (uses the leftmost an rightmost annotations for anchor points and adjusts the inner annotations equally from them) |
|
|
Align on the top side(it will choose the topmost annotation) |
|
|
Center vertically |
|
|
Align on bottom side(it will choose the bottommost annotation) |
|
|
Space selected annotations equally vertically (uses the top and bottom annotations for anchor points and adjusts the inner annotations equally from them) |
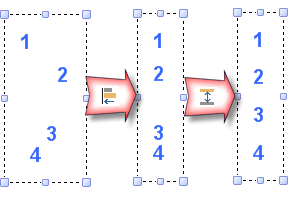
In this example, we have aligned some text boxes on the left, then spaced them equally, vertically:
The alignment feature works for more than just filling out text boxes on forms. You can also use it for other annotations, such as stamps.
Group and Lock
If you group several annotations, they will be treated as though they were one selection. This allows you to align several different groups of annotations separately, and then align the grouped selections.
Remember that locking an annotation or group of annotations keeps them from moving on the document. If you have an annotation where you want it, lock it in place to keep it from being affected by further alignment procedures. They can be unlocked later if you desire.